
1. Log into Priority Software FBS using your USC NetID.
2. Select the Products/Services tab.
3. Select the SKU icon.
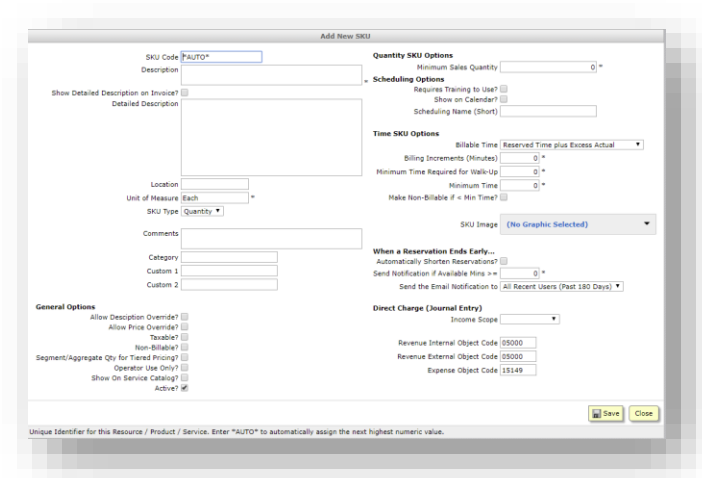
4. Under Actions select ‘Add New SKU’.
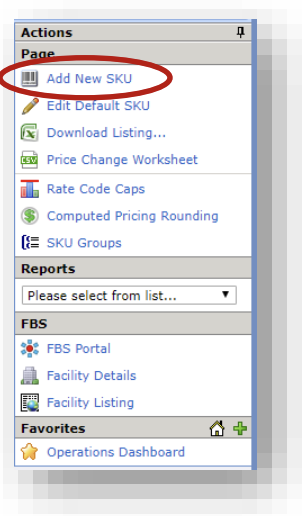
5. Fill-in and save.
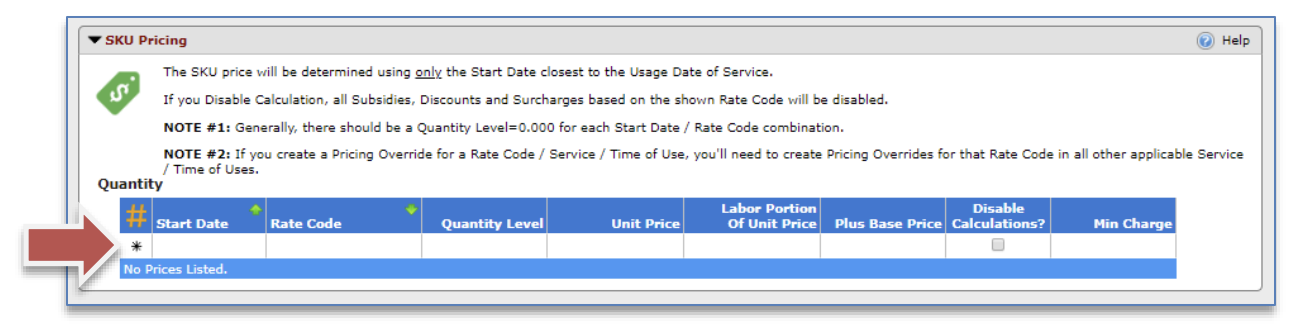
6. Scroll down to the SKU Pricing to add pricing breakdown. Double click on row to start a new rate.
- Log into Priority Software FBS using your USC NetID.
- Under Products/Services tab, click the down arrow from the Catalog icon to select Edit Catalog.
- To create the different categories, enter in the category information in the next open row.
- Click the + to add/edit items found in each Category. Click FBS Portal from the Actions pane to view changes.
1. Log into Priority Software FBS using your USC NetID.
2. Select the tab.
3. Select the SKU’s icon.
4. Under Actions select ‘Add New SKU’.
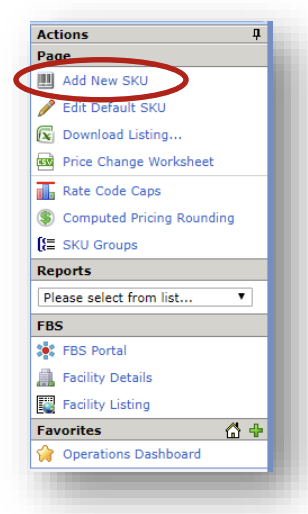
5. Fill-in all necessary information and save.

More information on how to add a SKU can be found here: https://usc.fbs.io/pskb/pskb.aspx?kb=1005
NOTE: Training sessions can only be made by the core operators. Users do not have access to book training sessions.
1. Log into Priority Software FBS using your USC NetID.
2. Select SKU under Products / Services tab.
3. Setup Training as a new SKU.

4. Make sure the following is uncheck in the Training SKU information: Show on Service Catalog? Show on Calendar?
Make sure to following is checked in the Training SKU information: Operator Use Only?
5. Add SKU Pricing.

6. Select the equipment SKU to associate the training SKU with.
7. Scroll down to Resource Use Type. Then select the Equipment SKU as Unassisted Use for the first line. Then add second line for the Training SKU.
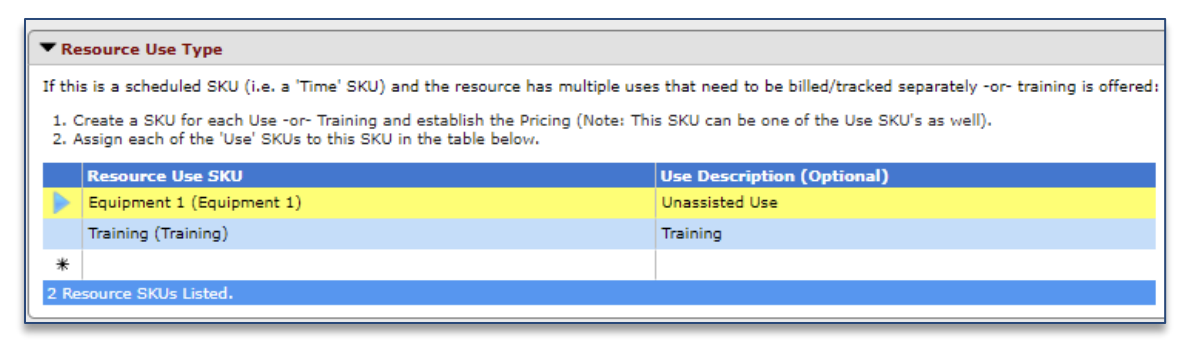
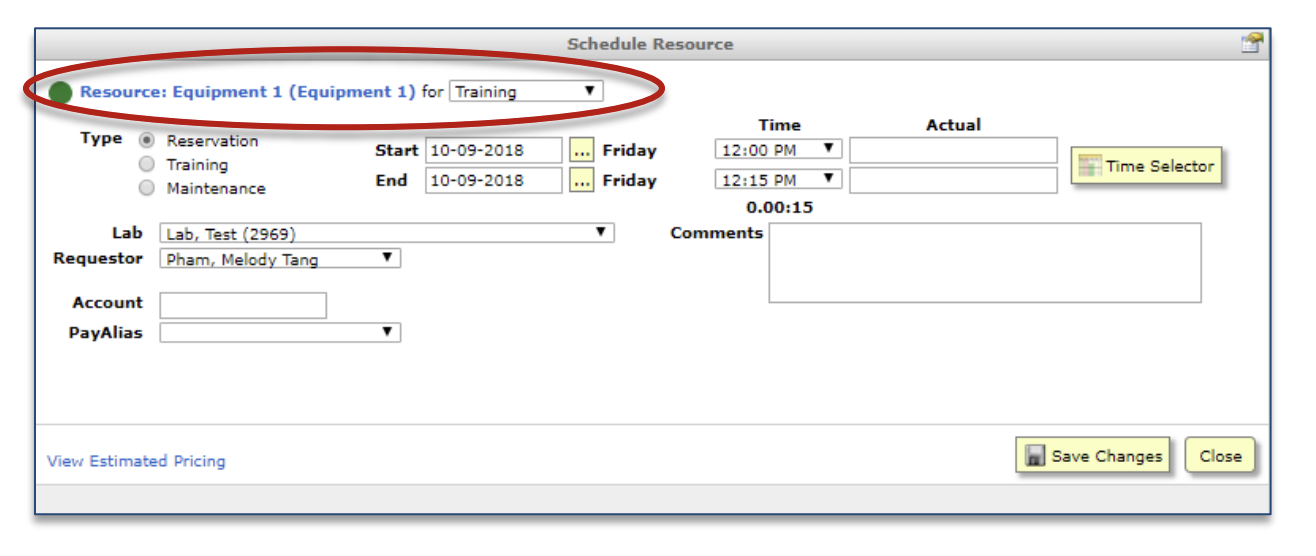
8. Your Training SKU is ready for use. When making a reservation, be sure to select Training to apply the pricing structure created in the Training SKU.
1. Log into Priority Software FBS using your USC NetID.
2. Edit the SKU under the Products / Services tab. Select the equipment/calendar SKU for editing.
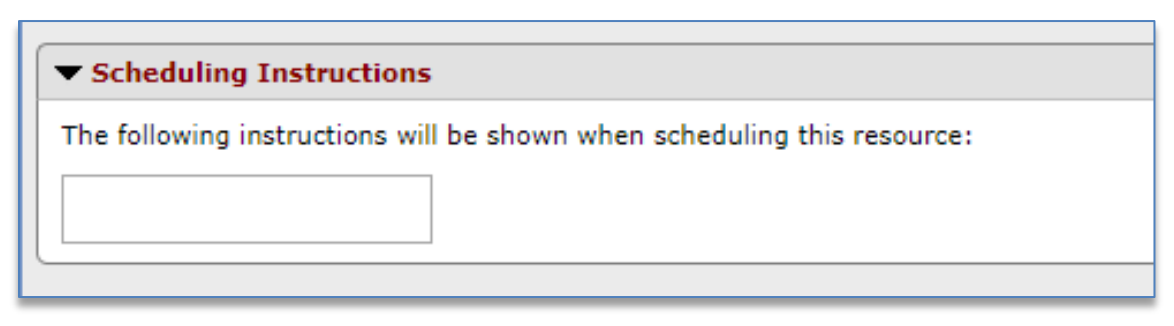

3. Type your message in the Scheduling Instructions at the bottom of the SKU page. Users will see popup instructions after selecting time for appointment.
1. Log into Priority Software FBS using your USC NetID.
2. Select the Product/Services tab.
3. Select the SKU’s icon.
4. Select the SKU for edit.
5. Uncheck “Use Scheduling Defaults” to edit Prime Hours and/or enabling Start/Sop Buttons
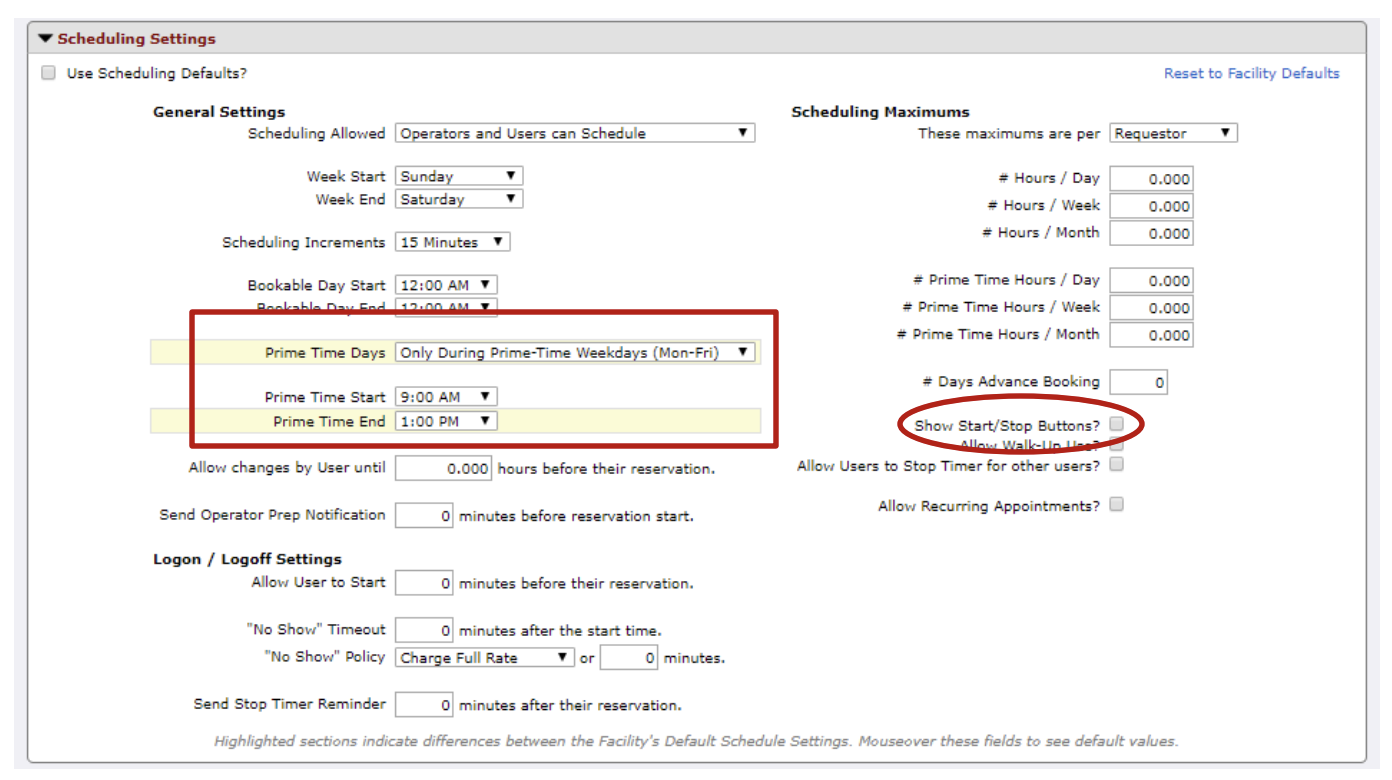
6. Membership rates, external users, and base rates are managed in SKU Pricing. Disabling calculations means you are using the entered rates instead of the existing Rate Codes.

1. Log into Priority Software FBS using your USC NetID.
2. Select Rate Codes under Products / Services. Rate Codes are used to provide different price levels depending on the Lab/User group.

3. Scroll down to the table area and double click on a blank row to add a new rate code. Double click on existing codes to make edits.
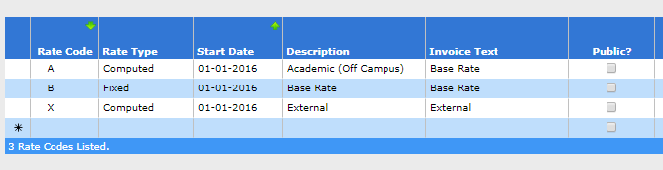
Related quick guides: Edit Lab Rate Codes.
1. Log into Priority Software FBS using your USC NetID.
2. Select Configuration tab > Facility icon
3. Scroll down to Facility Settings to enable “Scheduling Relationship feature” under Scheduling.
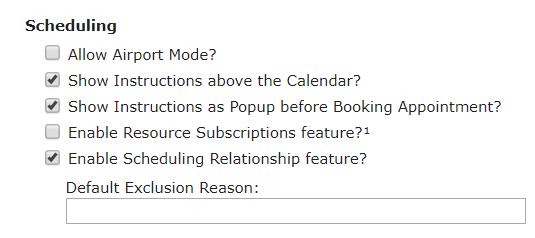
4. Enter the following text to Default Exclusion Reason: COVID19 Social Distancing – %SKU_Code% IS IN USE.
5. Go to SKU under Products/Services tab.
6. Select a SKU for editing > scroll down to Scheduling Relationships to create exclusion.
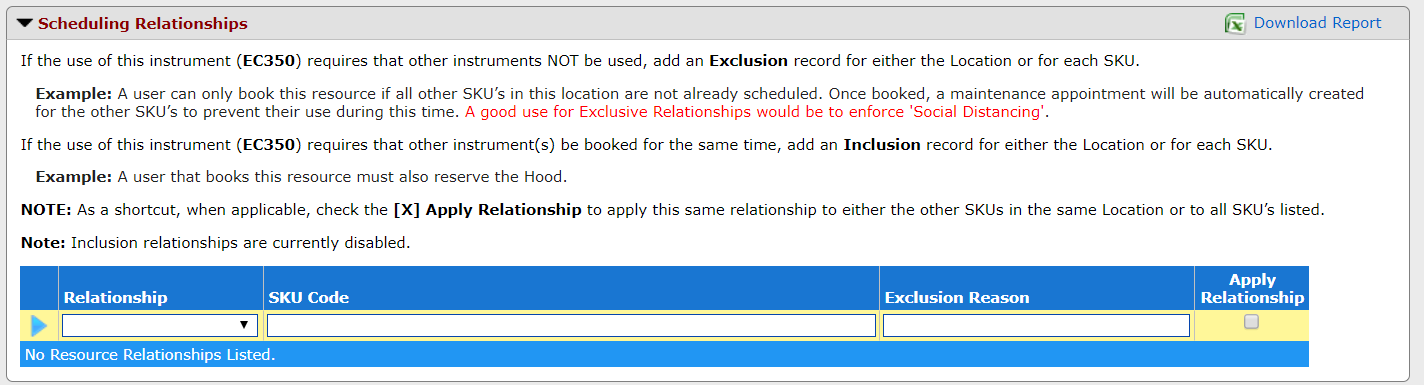
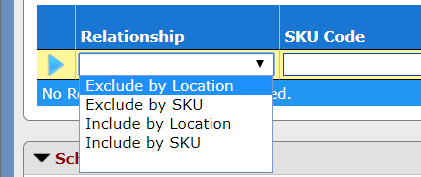
Exclusion by Location: SKUs within the same location (defined in SKU Information) will be excluded when this equipment is booked.
Exclude by SKU: will require you select a specific SKU to exclude when this equipment is booked.
1. Log into Priority Software FBS using your USC NetID.
2. From the Operations tab, click the Scheduling dropdown menu

3. Select file link under the Overview dropdown.
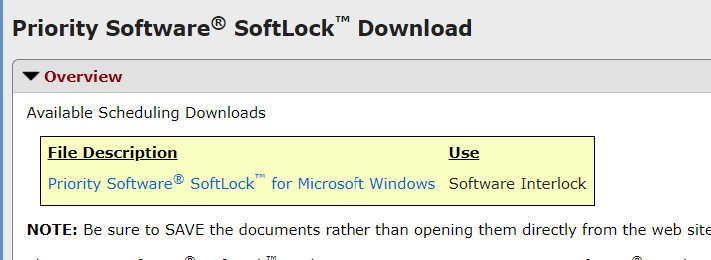
4. Once downloaded, install SoftLock using the setup.exe file.
5. To run as admin hold down the ‘shift key’ and right click on the Priority Software SoftLock icon.

6. Check the box for Enable Preview Mode during setup.
Uncheck once ready to go live.

7. Select SoftLock tab to connect the time SKU with this computer.
Area code: USC (Cancer Center use NCCC)
Facility Code: (core facility short name in FBS)
SKU Code*: (found in SKU settings)
*Update SKU settings to Reserved Time plus Actual under Billing Options.
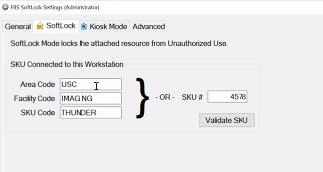
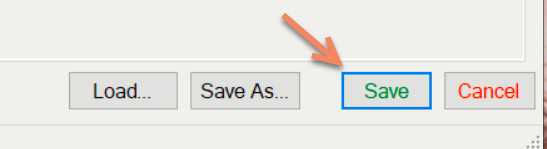
8. Validate SKU and Save the settings.
9. Click on the ‘Start’ button to test or activate usage.
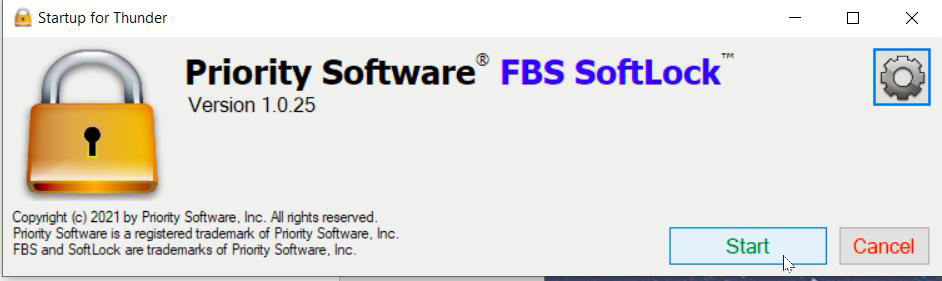
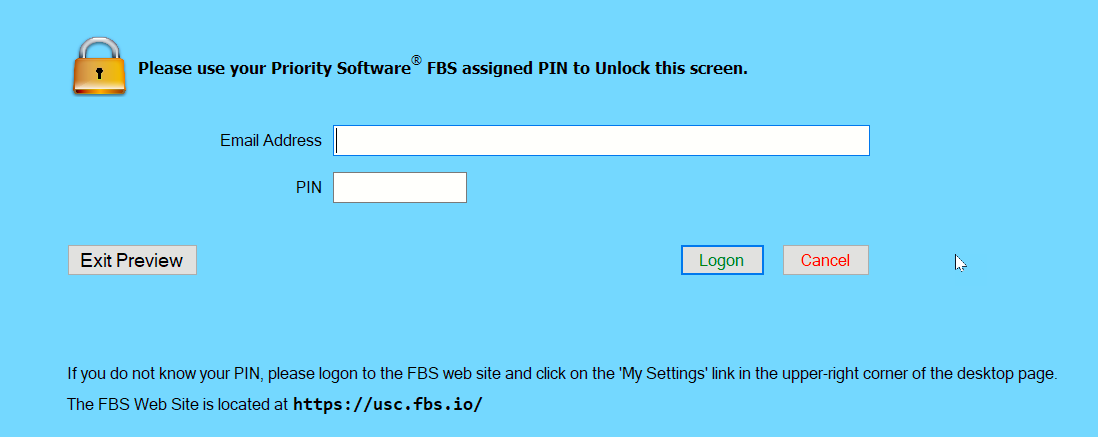
10. The computer screen will now be locked and display the following.
Moving the cursor will activate a logon screen. Email address and FBS PIN can be found in ‘My Settings’ at the top right corner of the FBS website.
Each school has its own internal process for iVIP accounts. Please contact your school’s administrator with the following information of your external user and request for Office365 and Coeus access on all iVIP accounts.
Note: some schools may require a photocopy of a picture ID along with the information – please see admin for more information.
First Name
Last Name
Date of Birth*
Email Address
Business Number
Business Address
Core’s Department
Core’s Name
*DOB is required as it is a unique identifier.
Administrator Information:
School:
Name:
Contact:
Dornsife College
Han Tran
hantran@usc.edu
Keck School of Medicine
Brenda Marquez
bdmarque@usc.edu
1. Log into Priority Software FBS using your USC NetID.
2. Select the Labs Icon under the Operations tab.
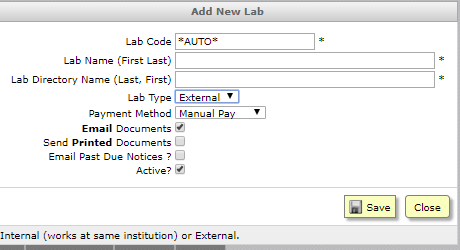
3. Click Add New Lab from Actions to create a new lab.
4. Enter external user First and Last name under Lab Name. Select External for Lab Type and Manual Pay for Payment Method.
5. Once the lab has been established, users (including PI) must be added to the Users section to receive notification emails. Primary box must be checked for all PIs. Any additional users wanting copies of the notification should be added as a user as well.

1. Log into Priority Software FBS using your USC NetID.
2. Under Operations, select the Labs icon.
3. Enter PI’s name under the Master Lab Name search field; then apply options.

4. Once you have located your PI, click Add to Facility to include this PI to your core facility.
1. Log into Priority Software FBS using your USC NetID.
2. Select Labs under Operations tab.

3. Locate the PI you would like to update then select the Lab Code associated with the PI.
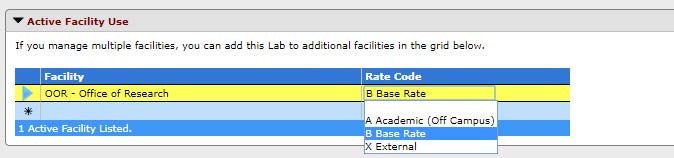
4. Scroll down to Active Facility Use.
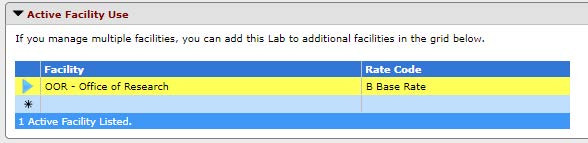
5. Double click on rate code associated with your facility to make edits.
1. Log into Priority Software FBS using your USC NetID.
2. Under Operations, select the Labs icon.
3. Select the Lab Code associated to the user you would like to remove from your core facility.
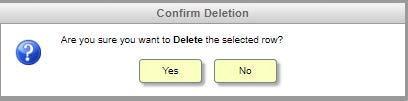
4. Once in Lab Details, scroll down to Active Facility Use. Double click your core facility name. Once the blue triangle appears, hit the delete key on keyboard.
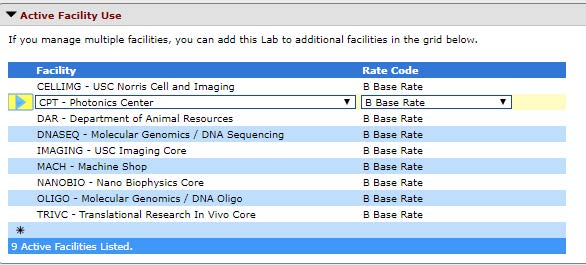
5. Double click your core facility name. Once the blue triangle appears, hit the delete key on keyboard. This will disassociate the user with your core facility.
1. Log into Priority Software FBS using your USC NetID.
2. Click on the Operations Tab
3. Click on Scheduling icon
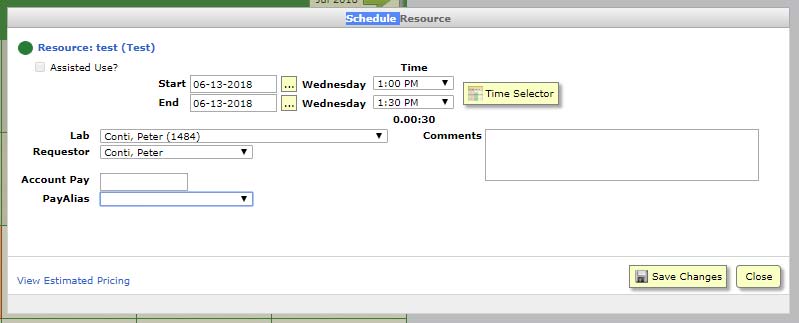
4. Select the resource to be reserved from the dropdown menu, then click on the Calendar day to create a new reservation.
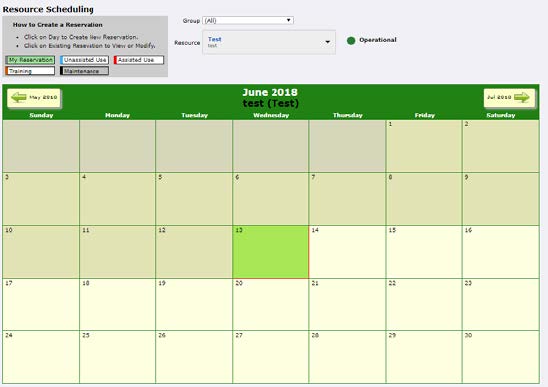
5. Fill-in all necessary information and save. The reservation will be recorded on the calendar and a confirmation email will be sent to the user.
1. Log into Priority Software FBS using your USC NetID.
2. Under the Finance tab, click Post Payments.

3. Pull up the invoice by searching for it in Search by Invoice.
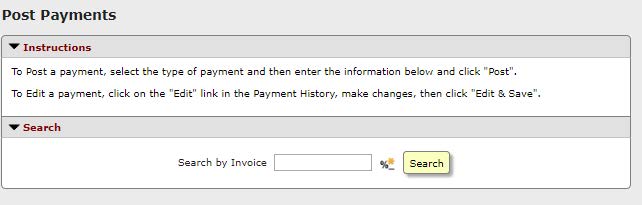
4. Click Add Payment to enter payment information.
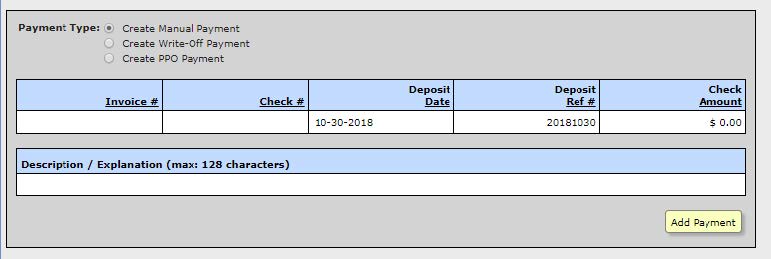
Use Revenue Category RC0527 Cash Clearing – Cores Billing when recording deposits through Cashnet. This will route to ledger account 101500 for account balancing.
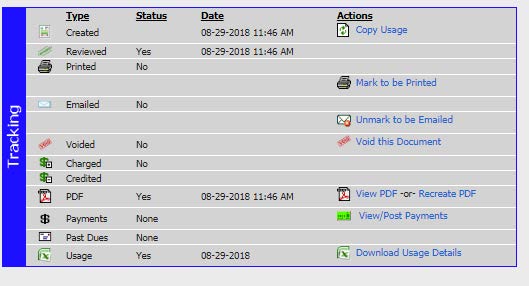
1. Log into Priority Software FBS using your USC NetID.
Please have the Invoice Number handy. This can be found in the dispute email and/or searching for it in the Invoice icon under the Operations tab.

2. From the Operations tab, enter the Invoice Number into the Document # and hit Enter from your keyboard to search.

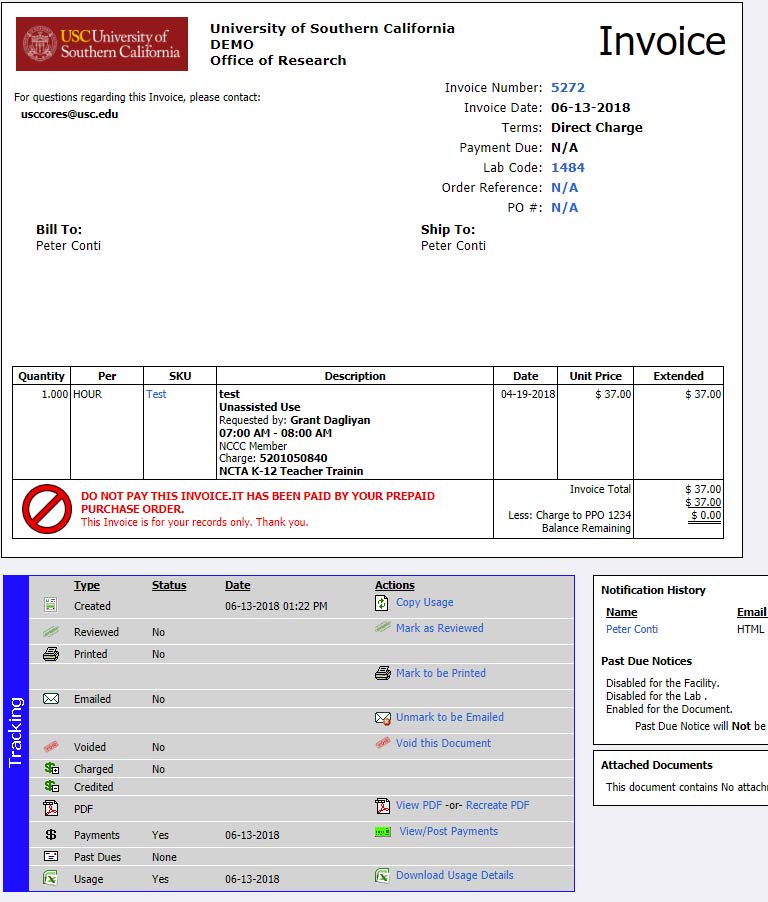
3. Once the invoice is called up on screen, scroll down and click Void this Document. This will bring all items back to the eLog for edits/refunds.
For refunds only: go to eLog > delete the original order by double clicking the order > hit the delete key on keyboard.
For edits only: go to eLog > make edits to original order > take order through the invoicing process again.
1. Log into Priority Software FBS using your USC NetID.
2. Click eLog under Operations tab to view all posted orders to process.
3. Scroll down to view and verify all orders. Double click the order line to make edits.
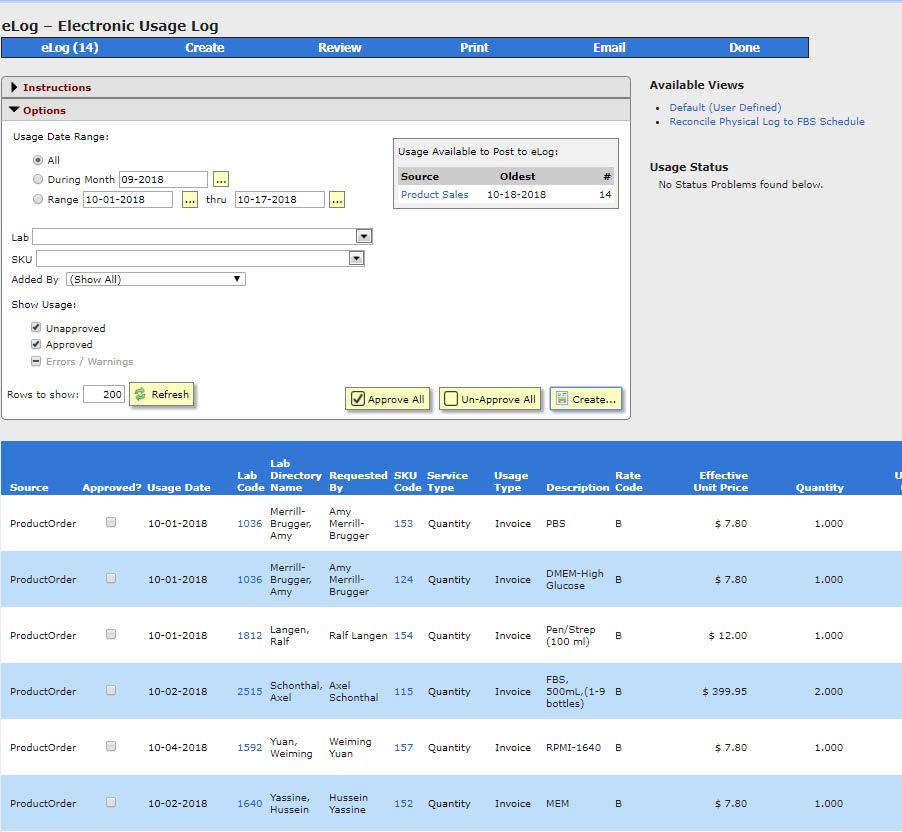
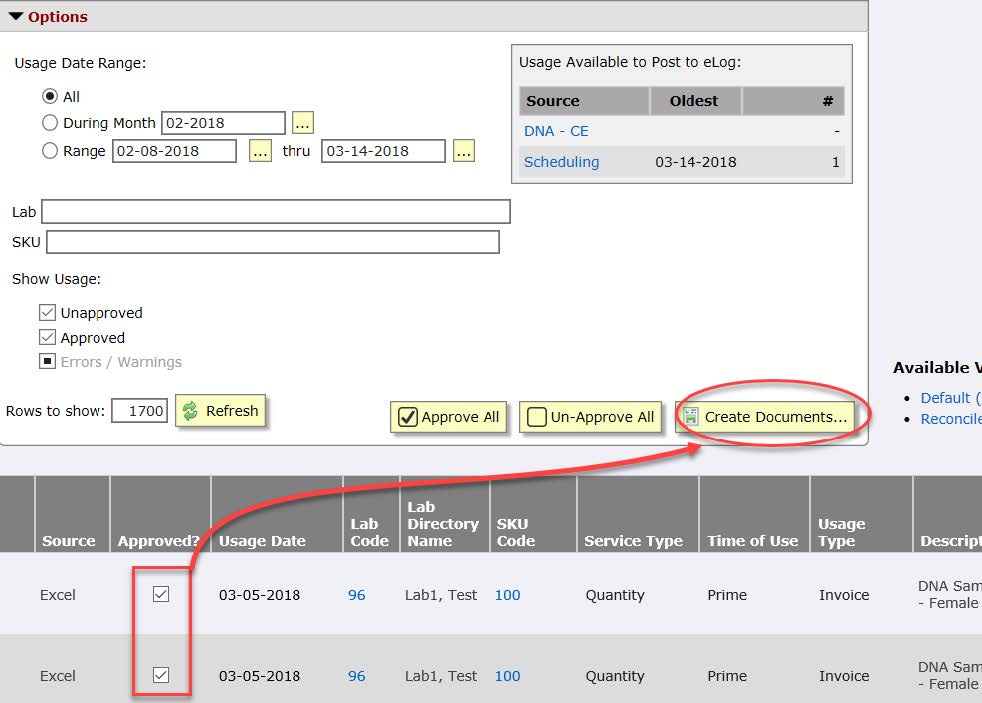
4. Once all items are verified and ready to process, either check the Approved? box for each order or use the Approve All button; then click Create.

5. After the Create button, verify the information on screen and click Create Documents button.
6. In the next screen, a pop-up window will display a summary of all charges approved up to this point. Select Review Documents when ready.
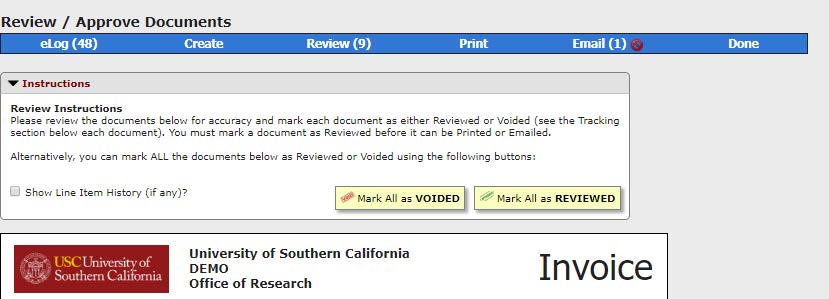
7. Review the actual invoice document and select Mark All as Reviewed.
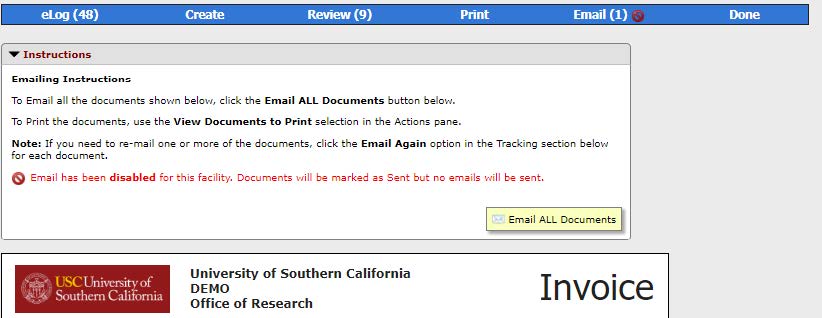
8. Then click Email All Documents to complete the invoicing process. Invoices will be sent directly to the PI and/or any lab members listed for copies. No further action is required from the core after this point.
NOTE: Invoicing deadline is 15th and 30th of each month; 5PM.
When a due date falls on a weekend, federal holiday, or when USC offices are closed due to weather or other circumstances, the invoicing deadline is automatically extended to the next business day.
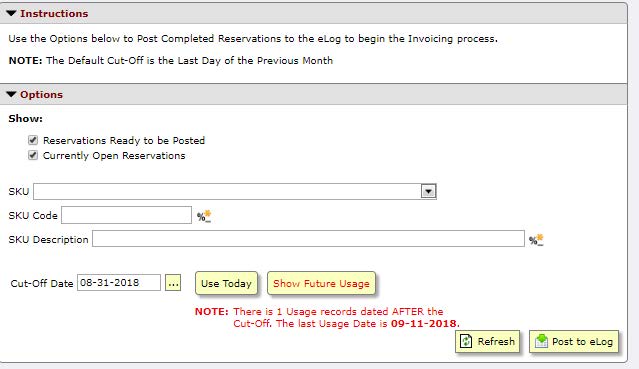
1. Log into Priority Software FBS using your USC NetID.
2. Select the Operations tab.
3. Select the Scheduling icon.
4. Select the Resource and change calendar to billing month.
5. Click Post to eLog
6. To view eLog activity, click eLOG icon.
7. Approve Invoices and click Create Documents.
8. In the next screen, click Create Documents to create invoice/quote for emailing.
9. Review and approve each invoice or select one of the following options: Mark All as VOIDED or Mark All as REVIEWED.
10. Emailing – select Email ALL documents to send invoices/quotes to PI.
Core Managers must email invoices at minimum of 5 days prior to the invoicing deadline (18th of every month). More information on how to invoice can be found here: https://usc.fbs.io/pskb/pskb.aspx?kb=1011
1. Log into Priority Software FBS using your USC NetID.
2. Open FBS Workbook then open FBS Library.xlsm to enable add-in tab in the FBS Workbook. Add-in tab will not appear unless the FBS Library.xlsm is opened after opening FBS Workbook.

3. All bold columns are required and must be filled in. DateTimeStart and DateTimeEnd is only used if the line is associated to a Time SKU.
4. Once all required fields are entered, click Validate FBS Data. Your FBS Workbook password/PIN will be requested after this screen. You can find your password/PIN in My Settings (next to the Signout button) in FBS.

5. Workbook will validate all fields. Verify that there are no errors in the UploadStatus and UploadMessage columns before clicking Upload to FBS.
6. Clicking Upload to FBS does not mean you have completed the invoicing processes. Upload to FBS only means you have moved all invoices from the excel sheet to the eLog. Click the eLog icon to complete the invoicing process.
1. Log into Priority Software FBS using your USC NetID.
2. Click New Order under the Ordering tab to begin a new invoice.
3. Enter the order information and click Checkout when done. Use the Add New Product Row to include additional items on this order. View the next quick guide on how to move checked-out orders to the eLog to begin the invoicing process.

1. Log into Priority Software FBS using your USC NetID.
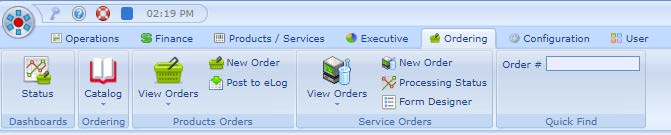
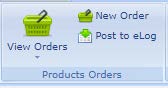
2. Select the Ordering tab.
3. Click Post to eLog from the Products Orders section in ribbon.
4. Filter for the date/orders you would like to move to the eLog. After clicking Refresh, all orders will appear at the bottom of screen.
5. Once you have reviewed all orders at the bottom on screen, click Post to eLog. All orders will then appear in Operations > eLog.
![]()
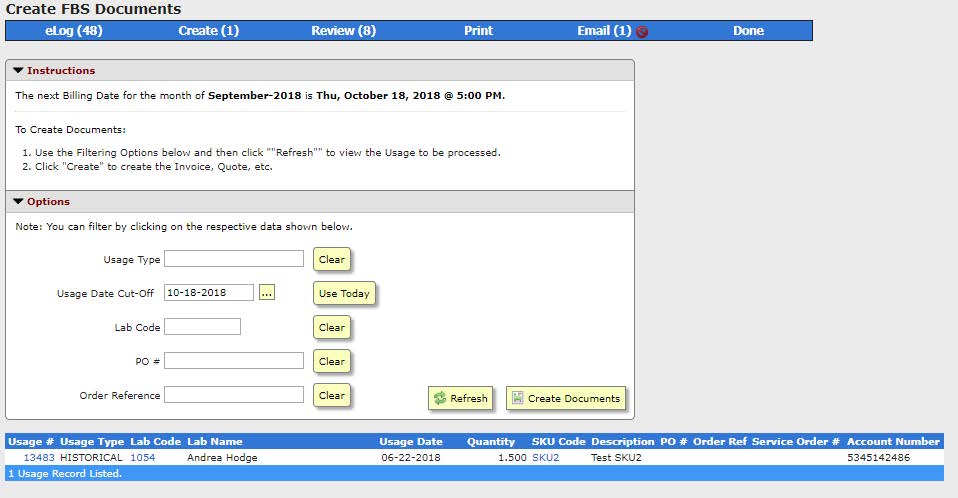
1. Log into Priority Software FBS using your USC NetID.
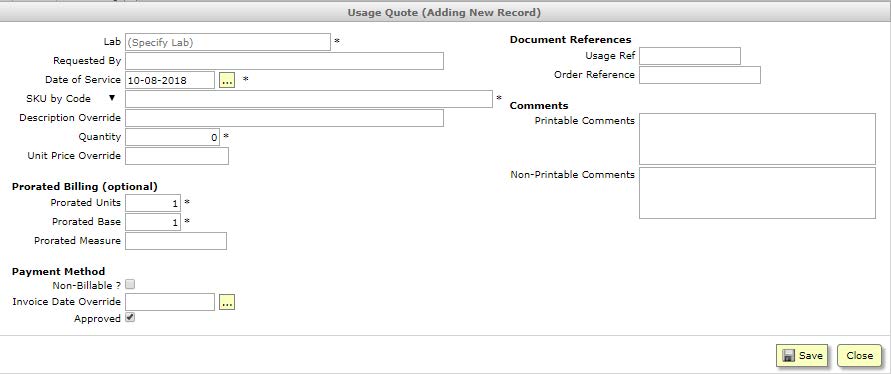
2. Select the Usage dropdown menu under Operations tab to view all posted orders to process.
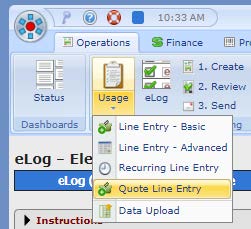
3. Fill in order information and click save.
4. Once all items are verified and ready to process, either check the Approved? box for each order or use the Approve All button; then click Create.
5. After the Create button, verify the information on screen and click Create Documents button.

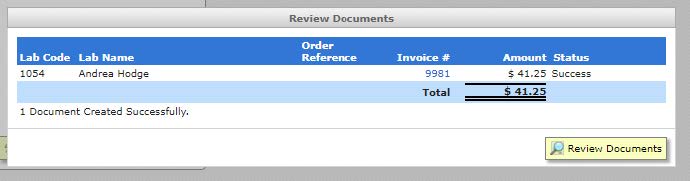
6. In the next screen, a pop-up window will display a summary of all charges approved up to this point. Select Review Documents when ready.
7. Review the actual invoice document and select Mark All as Reviewed.
8. Then click Email All Documents to complete the invoicing process. Invoices will be sent directly to the PI and/or any lab members listed for copies. No further action is required from the core after this point.

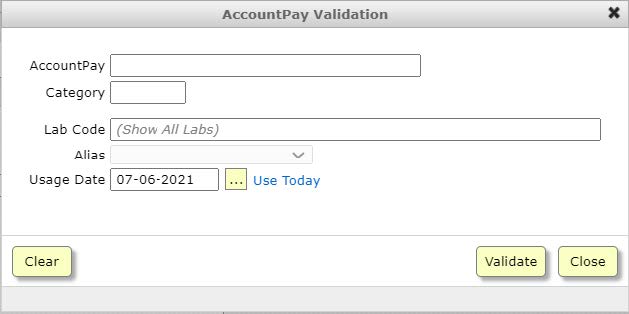
1. Log into Priority Software FBS.
2. Select AccountPay under Finance tab

3. Then select Validate AccountPay under Actions menu.
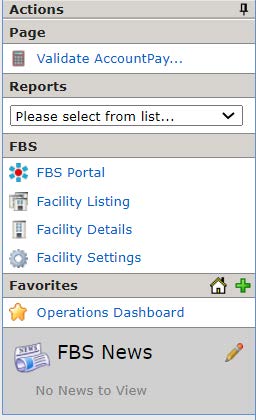
4. Enter the Kuali 10-digit account number into AccountPay follow by Validate.
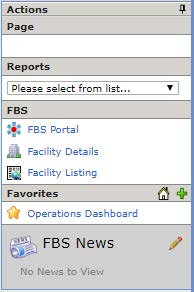
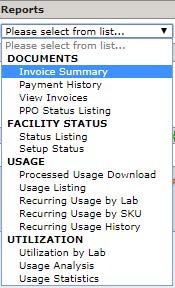
1. Log into Priority Software FBS using your USC NetID.
2. Use the Report dropdown menu in the Actions pane for reports.
Status Definitions:
Cleared – Fully processed – Invoiced, Batched, Uploaded and Cleared.
Paid – Manual Pay – Invoice not marked as Paid.
Pending – Invoiced, Reviewed, Emailed. Not in a Batch.
Sent – Invoiced, Revied and Emailed. Not Batched.
Uploaded – Invoiced, Batched and Uploaded. Not Cleared.
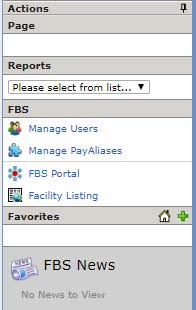
1. Log into Priority Software FBS using your USC NetID.
2. Select the Accounting icon
3. Select Manage Users under the Actions tab.
4. Select Add New User and fill-in information before saving. Use ‘@usc.edu’ email addresses only – @med.usc.edu, @ini.usc.edu will not work with the system.
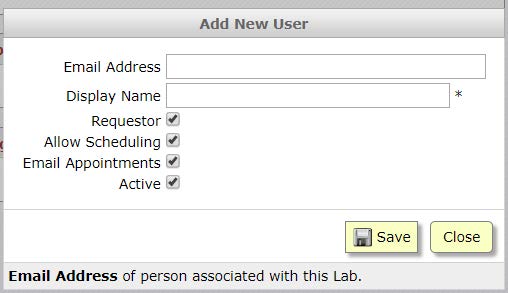
5. All users will appear under Users – Persons working on behalf of this lab. You can modify user access, to your lab, by checking and unchecking box for the following options.

Primary: PI or Primary person who is responsible of this lab
Manage Users: Allows user to add/edit/delete users of this lab.
Accountant: Allows user to view/change financial activity in this lab.
Requestor: Allows user to request for services at other facilities in FBS.
Allow Schedule: Allows user to schedule reservations using the FBS calendar.
View Docs: Allows users to view invoices/quotes.
Email Docs: User will receive a copy of all invoices/quotes sent to this lab.
Email Appts: User will receive a copy of all reservation appointments made.
A/P Drop-Box: Tells FBS that this is an email only account and only receives information.
Active: User is an active lab member.
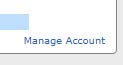
6. Additional step needed for Requestors. Click Accounting icon > Manage Account from the Requestor Account Access. Requestors can only use those accounts checked next to their name.

1. Log into Priority Software FBS using your USC NetID.
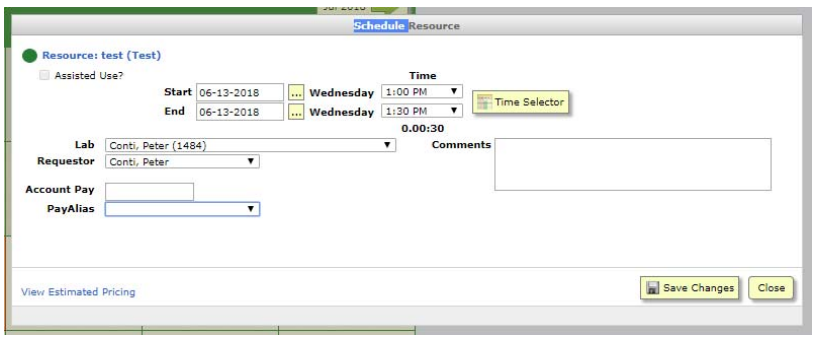
2. Select the desired facility from the Facility dropdown menu (right-hand corner of screen) then use the Schedule icon from ribbon.
3. Select the resource (equipment) from the dropdown menu then double click the day to create a new reservation.
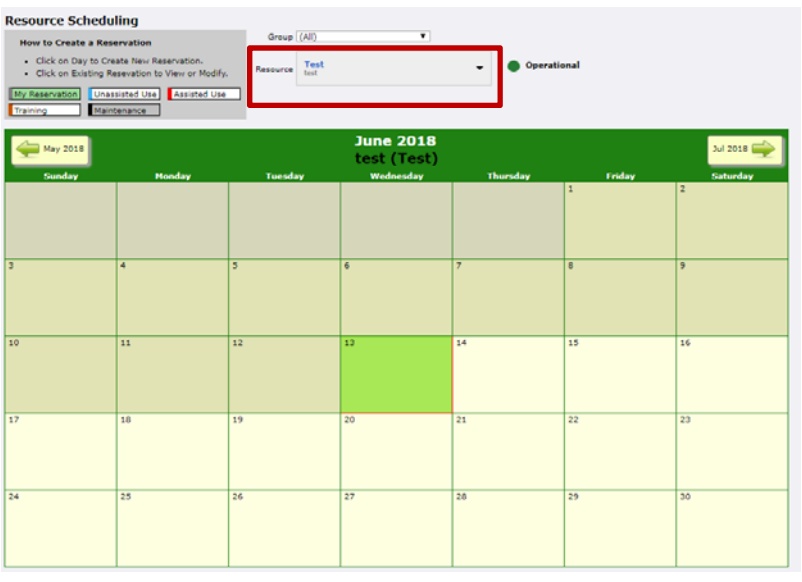
4. Fill-in all necessary information and save.
More information on FBS Terminology can be found here: https://usc.fbs.io/pskb/pskb.aspx?kb=0
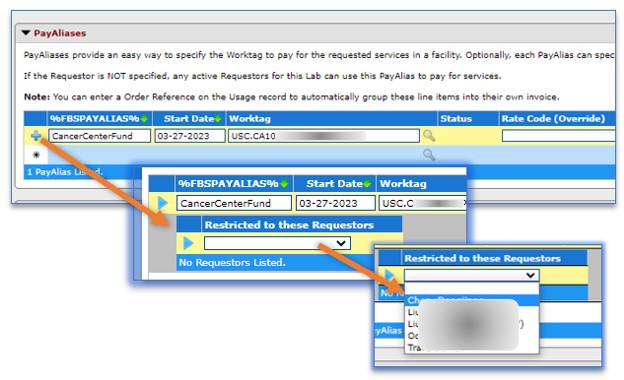
1. Log into Priority Software FBS.
2. Select Settings icon.

3. Click Manage PayAliases
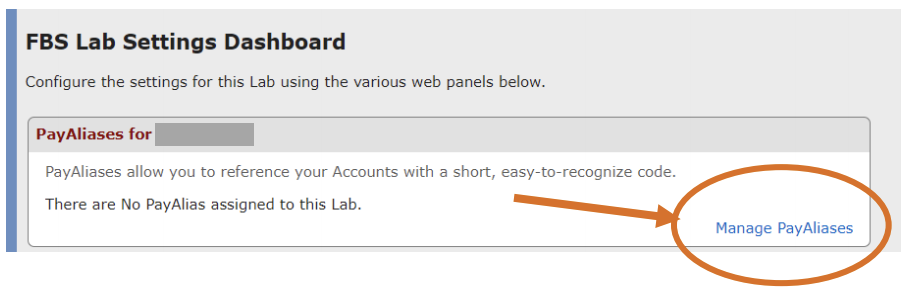
4. Fill-in the following:
PayAlias: Name of the account
Start Date: Account’s start date
Account: Workday’s worktag string (ie. company.costcenter.ppgg)
Order Reference:
Active: Check

5. Add lab members to pay alias (Requestors) by selecting the + sign then selecting the lab member’s name from dropdown menu.
1. Log into Priority Software FBS using your USC NetID.
2. Under the User Tab, click on the Activity icon.
3. Under Actions, select “Manage Users”

4. Under Users – Persons working on behalf of the Lab, select the permissions given to the new user, then click “Invite”. The new user will receive an email to login to FBS using Shibboleth Dual.

More information on FBS Terminology can be found here: https://usc.fbs.io/pskb/pskb.aspx?kb=0